Making a Folding Meditation Kneeling Bench
Posted by Admin • Tuesday, January 13. 2009 • Category: Low Tech HacksOK so this is pretty low-tech, but hey - why not? Kneeling benches are really unbeatable for meditation and prayer, but they are also great to just sit on - not only does it keep your back straight and prevents slouching, but it also places your feet right under you, so your weight distribution is optimal (and you don't fall). Sure, sitting like that can be tough at first, but it comes with practice. Plus, if you're intent on deep meditation, it is definitely worth getting used to.
I've made a non-folding bench before, and figured I'd try to make a portable one this time. I took what I learned from the last one and made some adjustments - I decided on a 10° angle this time. I also wanted it to fold and I didn't want the feet to protrude when folded. Here are the details.
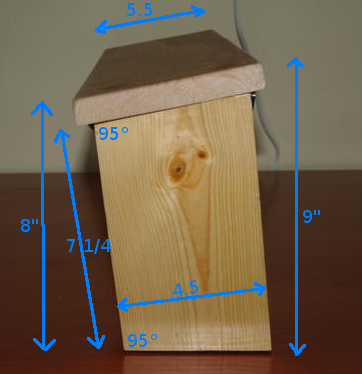
First, I realized that I don't need a 10° incline to be all at the top - so I split it into two 5° tilts on top and bottom. If anything, a bench like this may have a tendency to fall backwards, so tilting the whole thing forward would be safe.
Then, in order to keep the folded feet within the perimeter, I mounted the feet at 5° angle too, and now they fold straight. They stand at 5°, obviously, but that probably just makes it more stable.
Materials
So, to make one of those you will need:
- Wood (Sizes are a personal choice)
- Top Board: 5.5 x 18 x 3/4
- Feet (each): 4.5 x 8 x 3/4
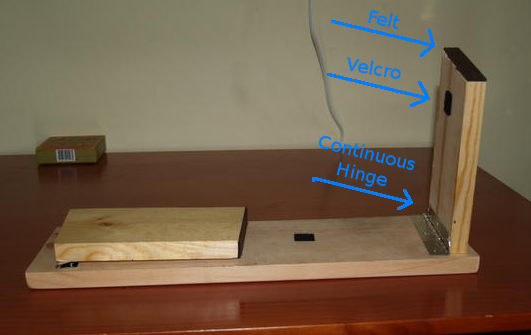
- Hinge - a continuous hinge works well (I had some leftover from my Van Furniture Project). Since I was using 4.5" boards, and I wanted at least 3 holes in my hinge, I cut them to about 5"
- Velcro (optional, to keep it closed)
- Felt (optional, to protect floors)

Tools
- Saw. A miter saw is best, and very much worth it. Mine is a cheap $70 compound miter saw from Home Depot, and it's been great. Any other type of saw will work (hand, circular, table, reciprocating, etc) but will require more time and effort
- Drill/Driver (for driving in screws)
- Metal Snips (for cutting the hinge - but a hacksaw or another tool may work too)
- Sandpaper (for smoothing edges and preventing spliters... or if you're intent on a deep mirror finish, then you already know what you need). I just rounded the edges with 80 and 220 grit, and left it at that.
- Alcohol (to clean the boards before velcro/felt application)

Construction
- Cut the top board. The dimensions above are approximate, you may want a larger/smaller bench. My body requires a fairly small bench, and that's what I made
- Cut the feet. On my miter saw, I simply click it to 5° and cut. The height, again, is up to you, but the dimensions given in the images work well for me
- Cut the hinge (unless you have a different type of hinge) to be either the same length as the feet or longer... if it's longer, you'll need to taper the corners on one side, so they don't stab you

- Test that the feet fit on the surface of the top board, as you move them through their future range of motion
- If you care to varnish your bench, you should do that at this point
- Mount hinge to feet, then to top board - I used a 5° angle so that when closed, the feet line up with the top board perfectly
- Some felt and velcro, and you're done.


Thank you for this post. I am going to use this info for a bench I am designing.-Cathy