Assembling the Sapac Exceed Pitts S2A 4ch R/C plane (and some improvements)
Posted by Akom • Friday, September 5. 2008 • Category: ToysI have to admit, I've never owned a real R/C plane before, so the following may be painfully obvious to someone who has. When I say real I mean hobby grade. OK I admit it, I had a Hirobo Shuttle nitro heli for a while, but I crashed that so many times that I'd rather not go there. What I learned in the process though is - simulator software is not optional. So this time around I borrowed a friends' copy of Realflight G4 with the controller. I am steadily getting better.
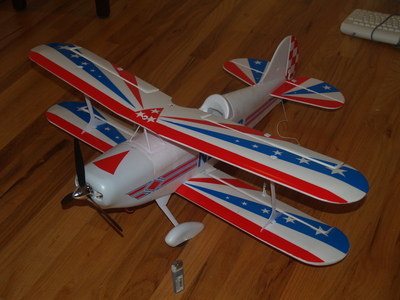
Anyway, so I bought the RTF version, which, I have to keep reminding myself, stands for Ready-To-Fly. Raidentech.com is one of the few places that sold it at the time and I found a free shipping code (CJFREESHIPPING) on somone else's blog. It eventually arrived, in a very large box (OK so I should have expected that, the plane has a 3 foot wingspan). On to assembly...
The good:
- Comes with an E-Sky balancing charger (0.8A), which I guess is safer than charging all 3 cells of the 1.2Ah Li-Po battery in series. It seems to be a name brand so I'm going to guess that the battery is less likely to explode.
- Overall well packed, looks solid, big wheels (my concern for rough asphalt), everything seems to work.
- All the decals/paintwork are already on the plane. This may be a con for some, but I don't really care and would probably never apply mine myself... and they should help differentiate the top from bottom from a distance.
The bad:
- The included wall-wart (110V) for the charger and the car battery cord both have 2.5mm barrel connectors for their output. The problem? The included E-Sky charger has a 1.3mm input jack. (This is a guess, but it's way smaller). Somehow it works anyway, but it pulls out at the slightest movement, and possibly resets the charger program.
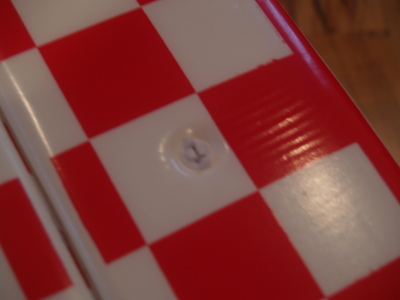
- The motor shroud is attached by tiny screws at top and bottom, and the bottom screw ripped out a chunk of foam and is no longer holding anything. It was packed well so must have happened before packing. I am sure this can be glued back into place, and they do include glue.
- The wheels bind. Maybe not bad enough to cause issues, but I wasn't about to find out. The problem is that there are washers on only one side of each wheel, and the tires rub the "floats" on the side without washers. I would remove the decorative floats altogether, only they are not just decorative - they are structural. I fabricated little washers from milk jug plastic (5mm piece with a hole), and it's all good now.
- The instructions. OK, these are horrendous. The only thing they give you is the sequence of assembly. The pictures are tiny and show no detail, so assembly becomes an adventure of guesswork ala "Will this fit in here?". This is especially tricky with figuring out the little lock pieces that come in a bag, as they are not mentioned at all in the instructions, and with hooking up the wing servo connector to the receiver - the receiver seems to be a 6 channel, so 3 possible connector jacks are free.... I guessed wrong the first two times
 ... The receiver beeped loudly and protested until I hooked it up to the right one (the bottom jack, as it turned out).
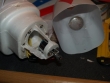
 - I still don't know how to assemble the prop correctly. It has hex nut recesses on both sides, seems not to be directional, and the motor shaft had two washers between the nuts. I can only assume that it goes like this (from rear to front): nut, washer(s), prop, nut, plastic nosecone thing, nosecone, mini screw. I have it set up this way, but the mini screw is not tight enough and the nose cone is loose. Fine with me if it doesn't break apart or cause vibration.
- On my first flight attempt the wheels came off (as they should)... except not as they should. There is the wheel assembly, and there is the plastic receptacle which is glued to the foam body. The wheel assembly should pop out of this receptacle. In my case, the receptacle popped out of the body. This seems to be a design flaw, the receptacle is not attached too securely, but the wheel assembly clicks into this receptacle way too securely. For now I used some duct tape ala double-sided tape to line the receptacle before reinserting it.
- The included balancing E-Sky charger can take a long time to charge the 1200mah battery at (supposedly) 0.8A... How long do you think it should take? 1200/800 = 1.5 hours max... Well, it has taken 5 hours. 5 hours of I don't know what it's doing to that battery right now. And unplugging it early gives you a half-charged battery. In the end, I have to admit, the charger seemed to top it off perfectly, but still - what is the deal?
<div class="serendipity_imageComment_left" style="width: 110px"><div class="serendipity_imageComment_img"><a class='serendipity_image_link' href='/uploads/photos/toys/rc/toys-pitts-p9051922.jpg'><!-- s9ymdb:5 --><img class="serendipity_image_left" width="110" height="83" src="/uploads/photos/toys/rc/toys-pitts-p9051922.serendipityThumb.jpg" alt="" /></a></div><div class="serendipity_imageComment_txt">Top wing - use flat washers under screws</div></div> <div class="serendipity_imageComment_left" style="width: 110px"><div class="serendipity_imageComment_img"><a class='serendipity_image_link' href='/uploads/photos/toys/rc/toys-pitts-p9051923.jpg'><!-- s9ymdb:3 --><img class="serendipity_image_left" width="110" height="83" src="/uploads/photos/toys/rc/toys-pitts-p9051923.serendipityThumb.jpg" alt="" /></a></div><div class="serendipity_imageComment_txt">Wing-to-wing connections. (looks obvious, but still)</div></div> <div class="serendipity_imageComment_left" style="width: 110px"><div class="serendipity_imageComment_img"><a class='serendipity_image_link' href='/uploads/photos/toys/rc/toys-pitts-p9051930.jpg'><!-- s9ymdb:12 --><img class="serendipity_image_left" width="110" height="83" src="/uploads/photos/toys/rc/toys-pitts-p9051930.serendipityThumb.jpg" alt="" /></a></div><div class="serendipity_imageComment_txt">Wing servos hook up to bottom jack on receiver</div></div> <div class="serendipity_imageComment_left" style="width: 110px"><div class="serendipity_imageComment_img"><a class='serendipity_image_link' href='/uploads/photos/toys/rc/toys-pitts-p9051927.jpg'><!-- s9ymdb:10 --><img class="serendipity_image_center" width="110" height="83" src="/uploads/photos/toys/rc/toys-pitts-p9051927.serendipityThumb.jpg" alt="" /></a></div><div class="serendipity_imageComment_txt">Tail assembly</div></div> <div class="serendipity_imageComment_center" style="width: 110px"><div class="serendipity_imageComment_img"><a class='serendipity_image_link' href='/uploads/photos/toys/rc/toys-pitts-p9051929.jpg'><!-- s9ymdb:8 --><img class="serendipity_image_left" width="110" height="83" src="/uploads/photos/toys/rc/toys-pitts-p9051929.serendipityThumb.jpg" alt="" /></a></div><div class="serendipity_imageComment_txt">Wheel with my custom washer (on left side of wheel)</div></div>
I was so concerned by the lack of instructions that I took some photos to help anyone in my position.
Incidentally, installing the rudder and the elevator was a very scary process - they seem fragile and to get them (especially the rudder) into the fuselage you just have to push, carefully, ideally not grabbing anything sensitive in the process. The friction fit is all that's keeping the tail components together, including even the wheel!
Caveats and Modifications
The following is the list of things I did to the plane after I flew it a few times.
- Throw out the glue they included, it doesn't hold well and melts foam. It may work on the taped surfaces, but is still not too strong. Go get some Gorilla Glue. This stuff impressed me so much I now sound like their rep. Hey, I wonder if I can be an affiliate?
- Make or find plastic washers for all three wheels. Without them, all the wheels bind a little, because the manufacturer only placed a washer on one side.
- Tape the clips that hold the wings. Tape them! Tape them. They can spin from vibration and come off, causing you to perform the fastest landing ever (That happened to me, see the following posts)
- If your plastic landing gear receptacle is loose or coming out, rip it out and glue it in with Gorilla glue (white version works great. Clamp it or put something heavy on it!).
- I modified the receptacle by shaving the click-tab off entirely - it was holding on to the landing gear way too well, and there was no way for the gear to pop out on impact, causing it to rip the fuselage instead.
- Tape the landing gear receptacle with packing tape. Just tape over it, then cut a slit for the gear to insert. This will keep the receptacle from ripping out in hard landing.
- Tape the wings at the breaking points - near the base. This will reinforce them at their weakest. Then reinstall the wings
- Reinforce the bottom clip that holds the rudder with some packing tape (to keep it from breaking off the fuselage). Mine came off after 3 flights, and i had to Gorilla Glue it back in and then tape. This is not a good thing to happen while airborne
- Tape the engine cowl on left and right. Without this it wobbles and eventually rips out the screw receptacles that hold it to the fuselage. (Mine came pre-ripped by Sapac)
- I installed the prop the wrong way the first time. It performs better with the sharp tips (near the hub) facing rear, the plane is definitely faster.
- Since the plane is very tail heavy (making it dangerous during landing), I added a weight in the front by taping a freeze plug (for a dodge 1500, mind you) inside the nose shroud.
 Weight in the nose


0 Comments
Add Comment