Akom's Tech Ruminations

Various tech outbursts - code and solutions to practical problems
Low Tech Hacks

Replacing batteries in a Philips Norelco T980 Turbo Vacuum Trimmer

Posted by Admin • Wednesday, July 27. 2016 • Category: Low Tech Hacks

I bought this trimmer in 2008 and the NiCd batteries finally died in 2016 - not bad. Still, no reason to trash a working trimmer and contribute to the landfill problem. As it turns out, it's fairly easy to disassemble, and even easier to reassemble. So here are the steps, which probably apply to many similar models.


Parts and order of steps

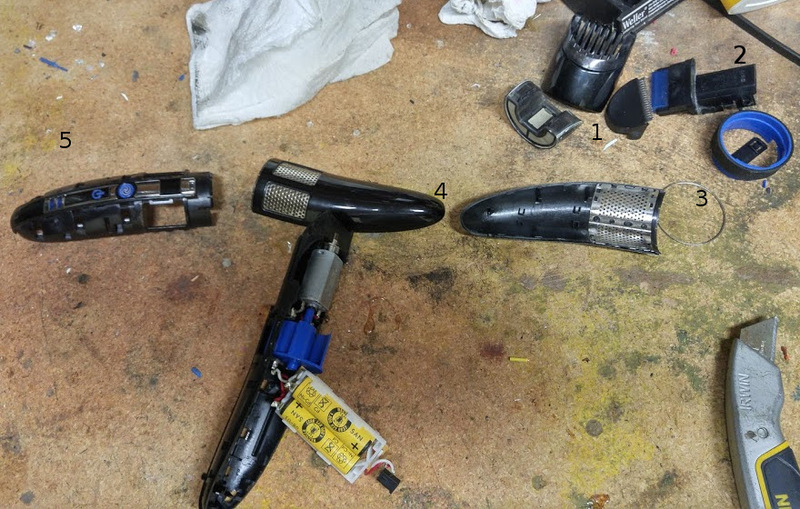
These steps are numbered according to the numbers in the image.

  1. Remove everything you normally would for cleaning.
  2. Unscrew the 4 little screws you can now see and pull out the black plastic bracket. It won't want to come out, you may need to use some force. Now pry off the height adjuster ring (push on some clips to release it). Be careful at this step, as soon as the adjuster's slider comes out, two little spring-loaded sticks will fly out. You'll need these. There is also a third spring-loaded piece behind the motor which will stay put unless you really disturb it.
  3. Now pry off the thin metal ring. This allows the sides to be removed
  4. Remove the sides.
  5. Pry off the front. The top clips you can release from the top, the rest just need to be forced by sticking a blade in the crack
Closeup

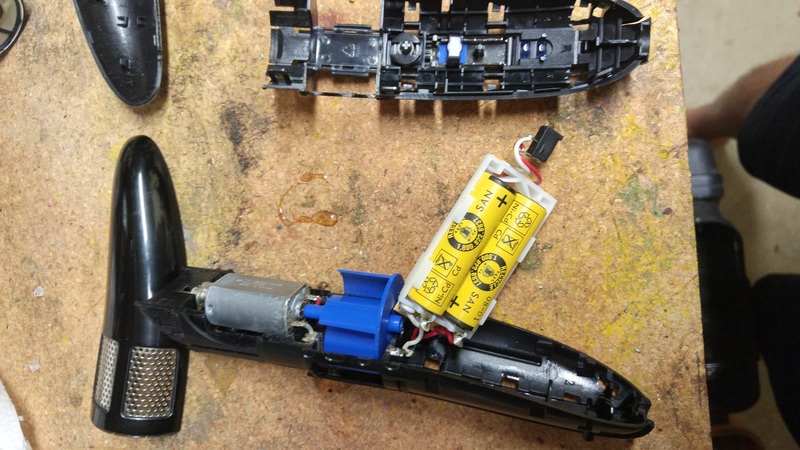
You should now have direct access to the battery tray. Solder in the new NiCd (or NiMh if yours came with NiMh) batteries and you should be good to go - reverse the steps to assemble, and give it a full charge.

Update 2020: forget batteries

In about a year, the trimmer killed the new set of batteries. It's clear that the charge circuit is not very nice to them. The cells are now essentially dead weight, but the trimmer still works in corded mode ... sometimes. The batteries now need to "charge", whatever minuscule capacity remains, before the trimmer will turn on. This can take seconds or minutes, and it's getting worse.

So I threw out the thoroughly corroded rechargeable cells and replaced them with... a capacitor. I found a 2200uF cap that fit into the battery tray. The capacitor stabilizes power delivery and the trimmer works great on both speeds.

Update 2021: forget the capacitor

According to Tom's comment below, the capacitor hurts more than it helps, so if you do go the corded route, try simply removing the batteries first.

0 Trackbacks

  1. No Trackbacks

29 Comments

Display comments as (Linear | Threaded)
  1. You are correct two little spring loaded things did fly out. When reassembling where do these go? Could please give details.

  2. Hello, your tutorial helped me a lot, The original batteries of my T980 are NiMh, so i replace with the same, I had very difficulties to understand where to place the 2 little springs. They just jumped out and i didn't understand where i had to put them back. So if anyone struggles with that too, their place is at the back of the main body chassis where we put the trim adjuster, you will see 2 little holes where they fit correctly. Thanky you very much for this!

  3. André, I'm having trouble getting behind the hair collection chamber to get to the 2 visible screws... ANY help on this would be greatly appreciated!

  4. There are three springs and three metal pins, two are alike. They are part of the trim height slider. The two similar ones go in the double holes, the springs actually just rest on the motor and the pins over the springs. The third goes in the lone top hole above. You will see the silver top pin when you begin disassembly. The paired pins are hidden behind the slider. Use a very fine screwdriver to guide all these parts in place.

  5. Hi Richard! Thank you for your response. I am a bit confused by the disassembly instructions.
    1. Remove everything you would normally remove for cleaning. (I've done this). 2. Unscrew the four little screws you can now see and pull out the black plastic bracket. (I can only see two screws and they are located just behind the hair collection chamber; only visible with the door open, each screw is located on either side of the center screen. Am I to pry this piece out prior to the height slide? Where is the best placement of thin screwdriver to work this collection chamber off? Note: I just removed the height adjustment slide; all 3 pins + springs still in place.
    D

  6. Hello. I have a problem finding the type of battery. Are these 1600mAh 1.2V? Please help.

  7. Pawel, don't worry about the capacity (higher=better). If your unit used NiCd cells, then get the best NiCd AA cells you can find. If it used NiMh, get NiMh. Charging logic differs for the two types of chemistry, so that's really the only thing that matters. Nominal voltage is always 1.2v on both.

  8. Thank's a lot

  9. Anyone, I am having trouble understanding how to " remove the sides ". Steps 1, 2 and 3 went just as described and now I am stuck because I can't figure out Step 4.

  10. Brute Force (TM), if I recall.

  11. Thank you for the tutorial, helped me a lot.

    A couple of comments, maybe you could update the main message. 1. In general, no need to unscrew 4 screws. Just move height adjust ring aside. 2. it is easier to assemble height adjust ring and slider at position 1

  12. Re: 1. Remove everything you normally would for cleaning.

    Do I need to remove the hair collection chamber? If so, how? I am afraid I will break something if I use brute force.

    Thanks, appreciate any advice Rudy

  13. Are you trying to tell us that you've never emptied the hair collection chamber? This raises enough questions to deserve its own post!

  14. Thank you for this post. I have an old T980 that I loved and the rechargeable battery died. This is the only forum that address this model specifically. I was stuck for a long time b/c I did not see the screws behind the collection chamber. Long story short I was able to replace the rechargeable battery and it is working like brand new. The difficulty I had in reassembling was finding the hole for the pins.

    Thank you again.

  15. Hello Folks, I replaced my batteries with higher spec replacements and managed to burn out the two larger resistors on the circuit board :-( Does anyone have a photo or information on what values they are? It is a better unit than the newer versions on the market and I would much prefer to get this working than bin it, so any help is more than welcome. Many thanks, David.

  16. I wonder if there were multiple variations on the translucent dark grey hair collection chamber? I can see all four screws, but I can't figure out how to remove the chamber without risking damage to something. To clean it I've only needed to open the hinged door on the top and shake or brush the hair out. The rear mesh appears to be a separate piece, which I think I could push out the way to reach the rear two screws, but the front two require the chamber to be removed.

    I tested the power adapter DC output, and it's measuring 9V instead of 2.4V, so I'm concerned some internal circuitry has blown in mine. It hasn't run while plugged in for a while, and now nothing happens when I plug it in.

  17. I would like to replace the rechargeable batteries with a capacitor as outlined in your instructions for the Philips Norelco T980. Could you please give me the type and voltage of the capacitor I should or could use? Thank you

  18. I used the largest electrolytic capacitor I had laying around that would fit into the battery tray. The voltage, as you can probably imagine, does not exceed 5V, so that won't be a problem.

    That said, there is something you should know. I am not 100% certain that the capacitor is necessary, or that it improved anything (maybe turbo mode works better?). When I use my trimmer, I need to push the on/off button 3 times, about half-second apart, in order to get it to turn on. This may be because the capacitor is charged rapidly and the charge circuit stops, so if I wait any longer, the capacitor discharges and becomes a drain on startup. I'd recommend removing your batteries and testing operation without a capacitor before going through the trouble.

  19. i am yet another user who cannot remove the hair collection chamber. my chamber has a door and is not normally removed for emptying. chamber removal seems impossible without breaking it. i will try prying apart the main sides of the shaver instead. the manual (pdf version online) explains how to remove batteries at shaver end of life for recycling, probably destroying the shaver. i cannot think of anything else to do.

  20. the hair collection chamber can be pried out by wedging in a flat screwdriver into the lower part of the side. no need to remove the height slider or dealing with jumping springs: just slide out the rings.

  21. I have read the posts regarding the difficulties of removing the hair collection chamber with an access door. My Philips Norelco T980 has this type of arrangement. I also had great difficulties understanding how to remove this chamber to gain access to the 4 screws for the black plastic bracket. After many hours of trying to figure out how to remove the chamber without breaking anything I discovered that the plastic screen at the bottom of the chamber can be removed. Once the screen is removed I could see the two plastic clips that hold the clear hair collection chamber to the body of the trimmer. The screen itself slides down and out of the hair chamber. Once removed it gave me full access to the 4 screws for the black plastic bracket.

  22. I followed your instructions and did have issues with the removal of the plastic bracket, what I did was to push the bottom of the motor back towards the little spring to allow the bracket to be remove. I did not install a capacitor, just un-soldered the batteries. It runs fine even in turbo mode the only issue is that I have to push the ON-Off button twice to get it to run, one less then with the capacitor : ) . Thanks for the tips and instructions, I really like this trimmer.

  23. Long and short of it, I have a Philips Norelco T980 that I would like to confirm that it is possible to convert this cordless over to strictly corded use. The batteries have gone completely dead, the lights no longer up green when plugged in to the power adapter, and I am not quite ready to part ways with this trimmer quite yet. According to Tom, all have to due is put it back together after unsoldering the batteries?

  24. Hey man - I just did this in Sept. '21 & it totally works. I bought batteries just in case but didn't even bother with them. I've had to use it plugged in for years anyway before it completely died, & I'd rather have full power all the time. This trimmer is so much better than the new ones available today & I'm so glad it's back in action! Thanks to Original Post

  25. Love my T980 Trimmer. It is the total package all in one. I've had all of the issues described. Finally, yesterday it stopped working & lighting up. I want to save it. I have the side panels off and pulled out the battery's holder. One end of the batteries popped up out of the holder, but the other terminals are attached by soldered wires. What is meant by, According to Tom, all have to due is put it back together after unsoldering the batteries?

    Can I simply snip the solder connections? What is my next step? Thanks to All & Happy Holidays!!

  26. If you are comfortable foregoing battery operation, it should be safe to simply cut off the battery tray wires and discard the whole tray. If you want to play it safe, you can first break the battery connection and see if it still operates to your satisfaction while plugged in. If it does, you can trash the battery tray. The easiest way to break the battery connection is to cut the tab connecting the two, at the end that popped up. This will take the batteries out of the circuit.

  27. Unfortunately, after I broke the batter connection, removed the battery tray, and reassembled the trimmer, I plugged in the power cord, and nothing happened. No green lights, no motor function. It was fun working on it. Thanks everyone for your advice. It was definitely worth a try.

  28. I got the batteries re-soldered, installed and almost everything assembled. The two pesky springs, the two steel pins and the T-shaped pin are still looking for a home. I saw one of the comments regarding their home location but couldn't seem to get a grasp on where they actually go. Appreciate any assistance.

  29. Coming back to give an update to the repair I did back in June of 2021. The trimmer is still going, I still have to press the ON-Off twice for the trimmer to turn on, also the turbo mode runs fine. No other issues to report, so again, thanks for the tips and instructions.

Add Comment


You can use [geshi lang=lang_name [,ln={y|n}]][/geshi] tags to embed source code snippets.
Enclosing asterisks marks text as bold (*word*), underscore are made via _word_.
Standard emoticons like :-) and ;-) are converted to images.
Markdown format allowed


Submitted comments will be subject to moderation before being displayed.